
Your Before and Afters App
for
iPad™, iPhone™, and iPod touch®
Resource Submission Instructions
This document will give you all the information you need to customize your Before and Afters app. We will hold your hand and make the entire process simple.
Don't be intimidated by this page: it's long, but the tasks are easy to accomplish.
Be sure to see the app work first, so you are familiar with its capabilities. Search the App Store for "Denenberg" to find Dr. Denenberg's app.
NOTE that your one app will work on any iDevice: the iPad, the iPhone (any version) and the iPod touch. On this page, sometimes we'll talk about the iPad and sometimes about the iPhone, but your app will be working on all of them.
You will be sending us information in various formats: image or video files, plain text or Microsoft Word documents, and information you write out on a piece of paper. You may send the information however you wish: email, burn data to a CD-ROM and put it in the postal mail, send a USB "thumb" drive in the postal mail, upload it to a cloud location -- whatever you find easiest.
The information does not have to all arrive in the same packet or at the same time: we'll open a folder for you, collect all of your submissions to use for your app. And as we're getting close to completion we'll let you know if anything we need is missing.
To make collecting and sending the information to us easier, you might want to go to this printer-friendly version of this page, print it out, fill out the printed sheets, and mail them to us.
Some of the photos on this page are from the iPhone presentation of the app, and some of the photos are from the iPad presentation. All of the photos were taken from Dr. Steven Denenberg's app.
1. The Application Icon
All apps have an icon. The icon appears on the screen of the iPad or iPhone. Some text (which you will also decide on) appears underneath the icon. Your app launches when the icon is touched:
The icon is a photograph or a drawing or composite image. You may find or create your own icon for your app. We recommend that you create your own icon: it can be your logo, or a portrait of the doctor's face, or an attractive design.
In addition, we have prepared thirteen icons, from which you may chose one for your app.
a.) If you want to create your own icon (recommended)
Your icon must be square. It can be a photograph or an illustration, or some combination. It can be a photo of your face, or your letterhead logo. It can contain text, but remember that your icon will be tiny on the screen of the device, so you need to check that the text will look good when shrunk to small size.
We are required to submit different sizes of your icon to Apple. Here are the sizes we need. All images must be .png's.
- 512 x 512 pixels
- 114 x 114 pixels
- 72 x 72 pixels
- 57 x 57 pixels
- 50 x 50 pixels
- 29 x 29 pixels
All six images must be the same image, just different sizes.
If your icon is simply a photograph, like Dr. Denenberg's icon, send us a 512 x 512 pixel version, and we will create all of the other sizes for you.
Dr. Darrick Antell used a portrait of himself as his icon. Here's what it looks like. If you wish to do the same, just send us the portrait. We'll crop it appropriately and make all the different icon sizes for you.
However, if your icon contains text or drawings, your designer will have to make the different sizes and send them to us.
b.) If you want to use one of our prepared icons
Go here to see the icons, and write the number of the icon you wish to use here:
Use icon number _____________.
2. Decide whether you want your icon "glossed"
The iPhone or iPad will round the corners of your icon. It can also put a "gloss" on your icon, to make it look "3D". The gloss shows up as a curved lightening of the upper part of the icon. Below left, we see the icon without the gloss, and below right with the gloss.
![]()
![]()
Some icons look better with the gloss. Dr. Denenberg felt that photos of models look better without the gloss. Please indicate here whether you want the iPhone to put the gloss effect on your icon (yes or no):
__________________________________________
3. Select the text underneath the icon
You control the text that displays underneath your icon.
![]()
The text under your icon can say "My Photos" or "Dr. Smith" or "Photo App" or anything you want.
By coincidence, "DrDenenberg" is the widest text that can be displayed under the icon. Here's how to tell whether your proposed text will fit:
Open Microsoft Word. Use the font "arial" or "Verdana". Actually, you
may use any proportionally-spaced font. In a
proportionally-spaced font, some letters are wider than others:
MMMMMMMMMM
iiiiiiiiiiii
Type "DrDenenberg" on one line, and then try your proposed text on the line below.
If your proposed text is wider than "DrDenenberg", it probably won't fit, so try something different. We will test your text to make sure it actually works on the iPhone before submitting your app to Apple.
Write the text to appear under your icon here:
________________________________
First of all, note that if you only have a few photos that you wish to put in your app, the app will still improve your practice's visibility, and it provides an easy way for potential patients to email you, send you their photos, and set up an appointment. You don't need a million photos to have a nice app.
Below, we see the top of the main table of contents page. This page scrolls. Each line in the table contains a tiny thumbnail photo and the name of the photos in that category (one line is circled in red below). When the user touches anywhere along that line, he is taken to the photos. Touching within the red oval below takes the user to the Rhinoplasty photos.
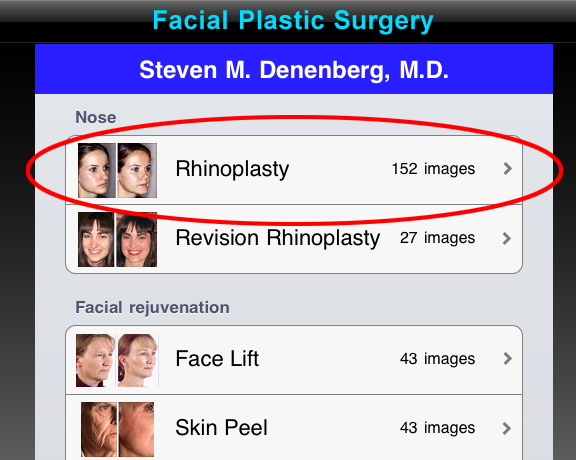
The lines in the table are divided into groups. Visible in the image above is the "Nose" group at the top, which contains two subheadings: "Rhinoplasty" and "Revision Rhinoplasty". The group name "Nose" shows up just above the red oval.
Below the Nose group is the start of another group, "Facial rejuvenation", followed by more subheadings, which are the procedures of facial rejuvenation.
Your table of contents page will be in the format of group names followed by subheadings.
It's nice to put your photos into logical groups like this. You can have a group named "Breast Surgery" under which will be the subheadings "Breast Augmentation", "Breast Reduction", "Breast Lift". Or you could have a group named "Fillers", under which would be the subheadings "Restylane", "Juvederm", and "Radiesse".
You can even have a group named "Miscellaneous" under which your subheadings would be "Photos of our office", "Photos of Dr. Smith skiing", "Photos of our overnight suite".
Anything that you take a picture of can be a subheading on your app.
Now here's what you need to do:
- Decide what photos you want to put in your app.
- Decide how you will divide them into subheadings. Generally, the subheadings will be the names of procedures. Then you might have more subheadings that wouldn't necessarily be before and after photos, such as "photos of our office".
- Tell us exactly how you would like to name the individual subheadings. The names will appear on the lines of this table of contents page. The user will tap the subheading names to get to the photos.
- Decide how you would like to put the subheadings into groups, as we have done above. Give the groups names, and tell which subheadings should be under each group.
- Tell us the order in which you want the groups to appear, and within each group, tell us the order in which that group's subheadings should appear.
This sounds like a lot of work, but really it's not.
Here's an example of what you might send to us:
Group: Breast Surgery
Breast Augmentation
Breast Reduction
Breast Lift
Group: Facial Rejuvenation
Eyelid Surgery
Face Lifting
Brow Lifts
Skin Peels
Group: Rhinoplasty
Primary Rhinoplasty
Revision Rhinoplasty
Group: Other Operations
Facial Implants
Otoplasty
Fillers
Hair Replacement
You can have as many (or as few) groups and subheadings as you wish, and as many (or as few) photos as you wish within each subheading. You can have 25 subheadings in seven groups, and 500 photos within each subheading, or you can have two subheadings in one group and only five photos in each subheading.
When you are ready to prepare your before and after photographs, go to the
Photo Submission Instructions page
to find out how to prepare and send your photos.
5. Table of Contents title bar and thumbnails
Here again is the top of the table of contents page:
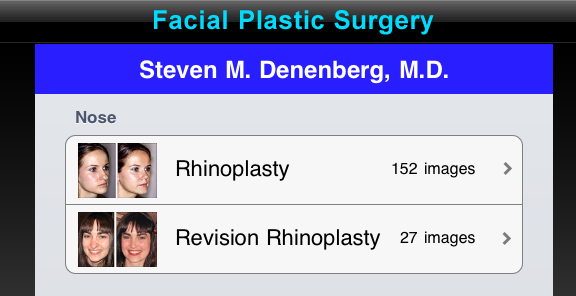
At the very top, it says "Facial Plastic Surgery".
Let us know what you would like that bar to say on your app:
__________________________________________________
Also, Dr. Denenberg's name is presented:
"Steven M. Denenberg, M.D."
Let us know how you would like your name to appear:
__________________________________________________
Finally, each subheading shows a thumbnail of one of the images in that subheading. However, you might have some subheadings where you don't want to show a thumbnail on the Table of Contents page. Why not? Well, maybe your subheading shows photos of labiaplasties. Or maybe you don't want thumbnails of bare breasts on your Table of Contents page.
You can have a placeholder thumbnail that looks like a camera in those instances:
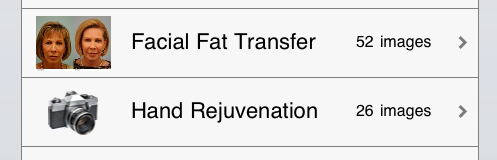
The above example, "Hand Rejuvenation", is just to show you what the camera looks like.
Let us know if there are some subheadings for which you would prefer the image of the camera, rather than a thumbnail of one of the photos in that subheading.
6. The group at the bottom of the table of contents
At the bottom of the table of contents page is a group that contains the "Favorites" subheading, as well as subheading links to the Doctor's Bio page and the "About this app" page:
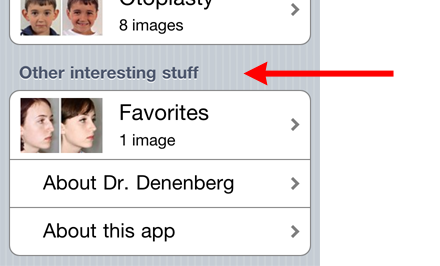
On Dr. Denenberg's app, the group name of that group is "Other
interesting stuff" (the red arrow points to the group name). Kind
of casual. I now like better:
"Your Favorites and More".
Tell us here what you would like it to say:
_______________________________________
7. Video organization
If you have videos that you would like your potential patients to see, the videos will be launched from the table of contents page. You can have a group called "Watch Videos", and the individual lines in that group will be the different videos on your app. Here's an example:
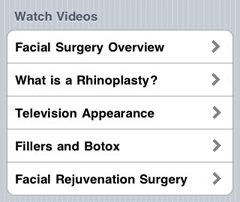
When the user touches a video name, the video will begin to play.
If you wish to put videos in your app, tell us:
- Whether "Watch Videos" is satisfactory for the video group name, or if you would like something different for the video group title.
- The titles of the videos, which will display on the table of contents page. (For example, the video titles in the photo above are "Facial Surgery Overview," "What is a Rhinoplasty?", "Television Appearances," etc.)
- The order in which you want the videos to appear in the videos group.
- And send us the videos, making sure we know which video file corresponds to the video title that the user will see.
Now read this tech-y sidebar if you have lots of videos that you want on your app:
Two considerations if you have MANY videos to put in your app.
First, Video files are large files. When you send your videos, we will try to reduce their file sizes without meaningfully reducing the quality of the video. Then, depending on how many videos you have, we will either program them into your app, or we will prepare your app to stream them. Here's what that's about:
When your videos are IN your app, they begin to play immediately when the user requests them. The app doesn't need to acquire the video through the device's wifi or phone connection, so they play great even if the user is in an area of poor network coverage. The disadvantage is that there is a limit on how many videos we can put into an app.
When the videos are streamed, there is an average
2 to 5 second delay
before a video begins to play, because the video is being acquired from
your server while it plays, through the Internet or the phone system. The advantage
to streaming is that you can have a limitless number of videos on your
app that way. If the user is in an area of poor coverage, the
videos won't play.
Dr. Darrick Antell's app contains videos that are within his app. Search the App Store for "NYC plastic surgery" to find it. Dr. Antell's app is 200 megabytes, somewhat large because of the videos, so it takes a little time to download to your device. You'll see that the videos start to play immediately when you request one.
Dr. Samuel Lam has 255 videos in his app, over 9 gigabytes worth, too many to put into the app, so his videos are streamed. Search the App Store for "Lam Dallas" to find his app. You'll see that there is a brief delay when you request a video, while your iDevice contacts his server to get the app.
Secondly, if you have more than about 10-15 videos to put into
your app, that's probably too many to give each video its own line in
the Table of Contents. In that case, you should divide your videos into
groups, for example: Television Appearances
What the Operations Can Do
Watch the Real Surgery
Video Testimonials
etc.
As many groups as you like, and each group would contain perhaps 3 to 15 videos. When the user touches "Television Appearances" in the main Table of Contents, she will be taken to another page where she sees all the Television Appearance videos, and she can now select the television appearance video that she wants to view.
Dr. Lam's app is set up like that: when you touch a video category on his Table of Contents page, you are taken to another page containing all the videos in that category. Dr. Antell's app, on the other hand, lists all of his videos on the Table of Contents page.
8. Contact Information
When the user clicks the "action" button, she is given options for how to contact you:

We need the email address at which you want to receive emails that are sent from the app:
___________________________________________
When this menu is presented on an iPhone, the user is given an option to call your office. Please give the phone number that you want the user's iPhone to call if she touches "Call Dr.'s office":
___________________________________________
Give the Web address that you want the user to be directed to if she touches "Visit Dr.'s Web site". We call that your "landing page." It doesn't have to be the home page of your site; you can use any page that you like. You can even create a landing page just for users of your app.
___________________________________________
Couple of notes about the Web address above:
If you don't have a Web site, or if you don't want users to have the option of going to your site from the app, just write "none" on the line above, and we'll remove the "Visit Dr.'s Web site" button from your app.
iPads and iPhones do not currently display Adobe Flash files. If your Web site contains Flash, and you have an alternate "html only" page, use the html page. Or at least view your Web site on an iDevice and see if you think it still looks okay. We will check it for you, too.
If you have no idea what we're talking about here, ask your Web person.
9. Doctor's Bio Page
If the user touches the "See all contact info" button, she is taken
to the doctor's Bio Page. Here is part of the page from Dr. Denenberg's
app:
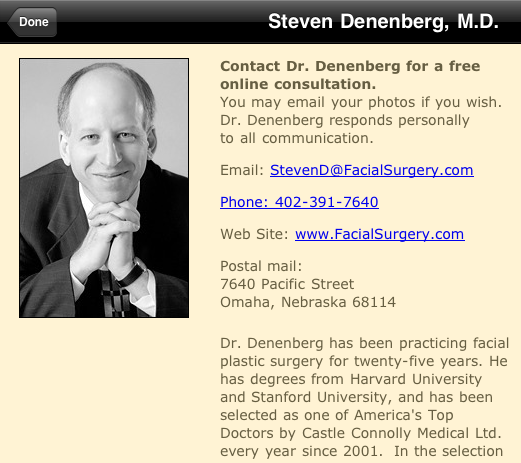
You can design this page as you like. The page will scroll if you have more information than will fit on one screen.
You may use photos, logos, custom background colors: the page is simply an HTML page, like a Web page.
![]() If you like the look and layout of Dr. Denenberg's bio page, you
don't need to design your own Bio pages. Just do this:
If you like the look and layout of Dr. Denenberg's bio page, you
don't need to design your own Bio pages. Just do this:
- tell us that you want to keep our design
- send us an image (photo or logo) to put on your page in the same location as Dr. Denenberg's photo. The image should be 300 to 400 pixels tall.
- and send us the textual content that you want for your Bio page. We'll put the pages together for you.
![]() If you want to design your own Bio page, do this
If you want to design your own Bio page, do this
For the iPhone and iPod touch, design a page that is 320 pixels wide, and as tall as you like, but don't make the user scroll too much. Referenced photos and other images should be in the same directory as the HTML file. In other words, the reference should say src="mypic.jpg" but not src="images/mypic.jpg".
The photos and images you submit for your page should also be sent to us at twice the size you designed for the page. For example, if you have an image of the doctor that is 100 x 150 pixels, then also send us that image at 200 x 300 pixels.
For the iPad, design a page that is 768 pixels wide. We don't need double-sized images for the iPad version of your contact info page.
You may have hyperlinks on the page, but don't have more than one
link to an email address, one link to a phone number, and one link to a
Web page. Telephone number links are done like this:
<a href="tel:402-391-7640">402-391-7640</a>
or just leave the link out of your phone number, and we'll put it in for
you.
If you look closely at Dr. Denenberg's app, you'll see that this page changes slightly as you move the device from portrait mode to landscape mode, to keep the layout readable and attractive. If you wish, you can provide us with two versions of this page: one to be displayed in portrait mode and another to be displayed when the device is turned to landscape mode. Submitting two versions for device orientation is not mandatory: if you have only one version, it will look as you designed it in portrait mode, and in landscape there will just be some blank space to the right of the content.
One more point: above the content of your HTML page, the doctor's name appears in the black title bar. Let us know if you wish to have some text other than the doctor's name appear in the title bar:
___________________________________________
10. The Application Description in the App Store
When your app goes live on Apple's App Store, the app's page on the store will contain an Application Description. A visitor to the App Store reads the Application Description to decide whether she wants to download your app.
You should provide us with the application description that you would like to have for your app.
Just below is the application description that Dr. Denenberg prepared for his app. You may use any or all of this text verbatim if you wish.
The
application shows before and after photos of Dr. Steven Denenberg's
facial plastic surgery patients. It's an easy-to-navigate collection of
photographs from his Web site, FacialSurgery.com.
The app is for people who are considering having Dr. Denenberg
perform their surgery: you can see the kinds of changes he can
accomplish and share the photos with family and friends.
The application is an easy and portable way to study over three
hundred before and after photographs in a more responsive and faster
format than browsing the Web.
With this app, you can also contact Dr. Denenberg to ask
questions. You get a free online consultation. iPhone users can use
their phone to take their photos and send them to Dr. Denenberg, all
without having to leave the app. Dr. Denenberg responds personally to
all communications.
Loading the app onto an iPad lets you read the app's electronic
books. The Tutorials teach you how the most common facial plastic
surgery operations are performed, with clear explanations and diagrams,
and copious photos taken during surgery. The Manuals show you how Dr.
Denenberg explains the operations to his patients, and gives you
information about what it's like to go through surgery and take care of
yourself afterward.
The electronic books contain 281 pages and over a thousand
photos, illustrations, and drawings.
On the iPad, the app also has a Frequently Asked Questions
section, with 24 questions answered in detail by Dr. Denenberg.
Dr. Denenberg is an expert in facial plastic surgery, with
degrees from Harvard and Stanford Universities, two board
certifications, twenty-five years of experience, and an international
clientele..
The major portion of the app is devoted to the before and after
photographs. Why are the photographs so important? Every plastic surgeon
performs these operations with different levels of skill. Seeing a
doctor's before and after photos is the best way, the only way, to
determine whether a doctor has the skill you seek when you are selecting
a plastic surgeon. Diplomas and certifications can't tell you the
quality of a surgeon's outcomes. Even if you do not download this app,
understanding this paragraph will help you immensely if you ever decide
on plastic surgery.
Three hundred and twenty-two before-and-after photographs show
you the changes that can be accomplished. The photos are organized by
operation:
Rhinoplasty: 152 photos
Revision rhinoplasty: 27 photos
Face lift: 43 photos
Eyelid surgery: 24 photos
Eyebrow lifting: 13 photos
Skin peel: 43 photos
Chin augmentation: 12 photos
Otoplasty: 8 photos
Who it is for::
Prospective patients of Dr. Denenberg
Anyone considering plastic surgery.
Anyone who simply wants to know more about plastic surgery.
By the way, the reason we needed a 512 x 512 "icon" is because that large image of you icon will appear on you Application description page in the App Store.
11. Screen shots of your app in the App Store
Also on your app's page in the App Store, you can have up to ten screen shots from your app. A screen shot is just an image taken from your app as it is running, to show a viewer examples of what your app looks like and entice her to download your app.
The ten screenshots include five from the iPhone version of the app, and five from the iPad version.
For his screenshots, Dr. Denenberg selected some pages showing attractive before and after photos, and also his table of contents page. You may select whichever pages you wish. You can see Dr. Denenberg's screenshots by going to his page on the App Store.
List below the pages that you want for your screenshots, and the order in which you want them displayed. For example, "Botox picture #3", "rhinoplasty picture #11", "porcelain crowns #8". Don't use breast surgery operations for screenshots, because they might cause a problem getting the application accepted. The app store itself is supposed to be G-rated.
You don't have to use before and afters for all of your screen shots. You can use the table of contents page, the Contact Information page, a playing video -- any pages of the app that you wish.
Also, if you wish, we will select the screenshots for you. Just write "you pick these, please" on one of the lines below.
List the five screenshots for your iPad version:
__________________________________________
__________________________________________
__________________________________________
__________________________________________
__________________________________________
List the five screenshots for your iPhone version:
__________________________________________
__________________________________________
__________________________________________
__________________________________________
__________________________________________
12. Your app's title
Every app has a title. The title is different from the text that is displayed underneath your icon on the iDevice.
Dr. Denenberg's app is called "Facial
Plastic Surgery: Before and Afters". That's about as long as your title
should be, and of course it can be much shorter if you wish.
Give your app a title
here:
__________________________________________
__________________________________________
13. Keywords and geographic targeting
When an iPhone owner is searching the App Store for an app, he searches using relevant search terms, like doing a Google search. The App Store, to determine whether it will suggest your app from someone's search, looks at the following text:
- The title of your app, and
- The "keywords" submitted with your app.
When we create your app, we give Apple the keywords that are relevant to your app, so your app will get found when someone is searching.
Keywords are separated by commas. Here are the keywords for Dr. Denenberg's app:
"Denenberg,cosmetic,surgeon,photo,picture,nose,eyes, face,lift,chin,rhinoplasty,skin,beauty,nosejob".
You will tell us what keywords you want for your app.
The keyword list can have 100 characters, including spaces and commas.
A two-word keyword might contain a space:
xxxx,yyyyyy,fat transfer,breast reduction,etc.
You can use Dr. Denenberg's list above as a starting point, and change it according to your practice. For example, maybe you don't perform rhinoplasty, or you want to say something about breast surgery, or Restylane, or porcelain veneers.
The title of Dr. Denenberg's app is "Facial Plastic Surgery: Before and Afters". Note that, since the words of the title of the app are automatically searched, Dr. Denenberg did not use "facial" or "plastic" or "surgery" in his keyword list. Those words from the title of his app will be recognized anyway.
The keywords allow you to do some geographic targeting, too. You might want "Cincinnati" as one of your keywords, so someone in Cincinnati who is searching specifically for that city is more likely to find your app.
Put your preferred keywords below. You may also leave this blank, and we'll design your keywords for your, or you may also write in just a couple of keywords that you want to see added to your keyword list, and we'll design the rest. Note that your last name (or your first and last name, if your last name is common) should be either in the keyword list or the title of the app, so someone can search the App Store for your name.
__________________________________________
__________________________________________
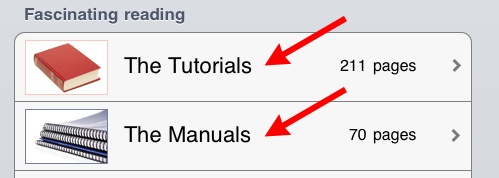
The iPad's screen is so large, it's possible to put lots of written content into your iPad app that the user can read like a book. See Dr. Denenberg's app: in the table of contents, touch "The Tutorials" or "The Manuals" and see the content that is available.
We call this content an "e-Book": it's like an electronic book that is in your app for the user to read.
(The e-Books only appear when your app runs on an iPad. Also: you really need to see the e-Books in action on Dr. Denenberg's app on the iPad to understand what the e-Books are like.)
You can put content like this into your app. Your e-Books can be your office brochures, care instructions, content from your Web site, anything that you have prepared that you would like to put in the app. It is absolutely optional: your app will be great without any e-Books. Put them in only if you want them in.
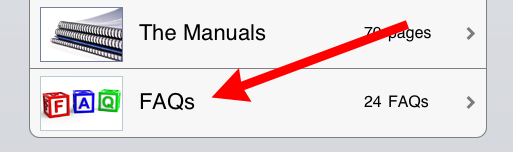
Each e-Book has one subheading line in the table of contents, as you see above. Each e-Book contains a collection of Chapters. Each Chapter is a collection of pages. Each page is a separate .html file.
In Dr. Denenberg's app, "The Tutorials" is an e-Book with about 20 chapters. "The Manuals" is an e-Book with four chapters. Each chapter has 5 to 20 pages.
To place an e-Book in your app,
- send us the title of the book (like "The Tutorials"). The title will appear in the table of contents
- send us a photo that we can use as an icon to the left of the e-Book's title in the table of contents, as you see in the photo above
- send the titles of the Chapters. It's okay to have only one chapter
in an e-Book. In this screenshot from Dr. Denenberg's app, the
Chapter titles are along the left column:
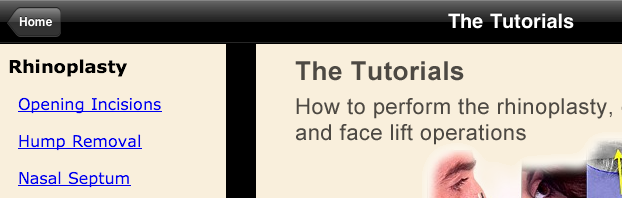
The user touches a Chapter title to read that chapter. - send the HTML files that comprise the pages of each chapter. One page is one HTML file. The HTML files should be named with the chapter title, followed by an underscore and the page number. For example, in the chapter titled "Fillers", the HTML file for page 1 should be named "Fillers_1.html" and page 2 should be named "Fillers_2.html" etc.
- The page HTML should define a page that is 768 pixels wide, or that
will wrap well on a 768-pixel-wide page. You control
the background color and all content and layout. The page can scroll
vertically, so you also control
the length of the page. All photographs and images for all the pages of
your book should be kept together in a directory underneath the
directory containing the HTML. For example, an image in an .html file
would be referenced thus:
<img src="media/MyPhoto.jpg">
-
When the user touches the e-Book's link on the table of contents
page, it takes her to the e-Book's introduction page. See Dr.
Denenberg's app and the image just below for an example. The top of the
introduction page (circled here in red) tells the user what the e-Book
is about, and the bottom of the page (circled here in blue) teaches her
how to navigate the book:
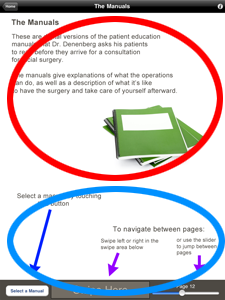
Besides the HTML pages of your e-Book's content, you should send content that will appear at the top of the introduction page for your e-Book, like the area circled in red above. This introduction should be 768 pixels wide and 446 pixels tall. We will add the navigation instructions to the bottom, and voila, we have your introduction page. The content you send for your introduction page can be an image or an html page.
The additional charge for creating e-Books for your app is $15.00 per page.
15. FAQs (optional)
(This section will be much more understandable if you are looking at Dr. Denenberg's app on the iPad as you read this page.)
If you look at Dr. Denenberg's app on the iPad, you'll see a subheading on the table of contents called "FAQs".
Touching that item takes you to the Frequently Asked Questions page.
You may have a FAQs page for your app if you wish. Here's how:
- send us a text document that contains a list of all the questions you would like to see on the FAQ page. On Dr. Denenberg's app you'll see that the questions are grouped into categories: "Rhinoplasty in general", "Revision rhinoplasty", "Facelifts, eyelid surgery, and brow lifts", and "General". You may divide your questions into categories like that. Let us know which questions belong in which category.
- Notice that the main FAQs page scrolls up and down. You may have as many questions as you like. The user will scroll to see the questions that are off-screen when the page first loads.
- When the user touches one of the questions, the answer appears in a "popover". Each popover-answer is an individual .html file. You can design those answers as you wish. Be sure to set a small left and top margin. The popover will appear with width = 440 pixels, so your .html answer pages should layout well to that width.
- You may have images and photos in your answers. As with e-Books,
photographs and images should be kept together in a directory
underneath the
directory containing the HTML. For example, an image in an answer's .html file
would be referenced thus:
<img src="media/MyPhoto.jpg"> - To the left of the word "FAQs" in the table of contents is a small image (see the screenshot above). If you want to use a different image than Dr. Denenberg used for the FAQs subheading, send us the image you would like to use.
You may also design the main FAQ page, which lists all of the questions, as you wish. In Dr. Denenberg's app, the page is somewhat plain. You may design something fancier if you wish. That page should be 768 pixels in width, including left and right margins. If you do not design your own main questions page, we will set up a questions page just like Dr. Denenberg's.
As with e-Books, the additional charge for creating FAQs pages for your app is $15.00 per question/answer pair.
16. Comments on the photos (optional)
This is a new feature, not present on Dr. Denenberg's app. If you wish to add comments or explanations to some or all of your photos, it is now possible. Here's how it works.
If the user is viewing a photo that has an explanation associated with it, he will see a little blue "Info" icon covering the top right of the photo:
![]()
Here is a close-up of the info icon:
![]()
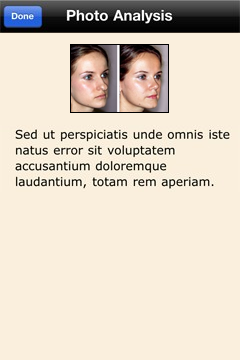
If the user is interested in seeing the information, he touches the icon, and the analysis appears:

The "analysis" or comment can contain just text, or other photos, or drawings or diagrams: anything you want to put on it. It will scroll, so if there's too much information to present on one screen, the user can scroll down to see it all.
When the user clicks the "Done" button in the title bar, he is returned to the photo he was viewing.
This link takes you to a YouTube video of this feature in action.
If a photo does not have an explanation, because you simply decided not to write an explanation for that photo, there will be no info icon presented on the photo. So you don't have to write explanations for every photo in the app, just the ones you select. You can have only one explanation, or none, or hundreds.
You also don't need to prepare other images to put on your photo analysis pages. If you want to just put up a text comment, your app will automatically place a small version of the photo at the top of the page:
And the best part: you don't have to compose your photo analysis pages until after your app launches.
You can design these pages at your leisure, after your app is already up in the App Store.
As you design your photo analysis pages, you upload them to a directory on your server, the computer that runs your Web site. Every time someone launches your app, her device will contact your server to see if there are photo analysis pages that she doesn't have yet. They are downloaded to her app automatically, without her even knowing, and they will be available to her.
So you don't have to delay getting your app completed while you prepare those pages: you can prepare those pages whenever you like.
Photo analysis pages are optional. If you have none, nobody will miss them; your app will run fine.
Before we create your app, we only need to know the name of the directory where you might upload your
photo analysis pages. If you don't know, and it's hard to get ahold of
your Webmaster,
we will assign it here:
http://www.YourWebSiteName/photoanalysis/
That address will almost certainly be fine with your Webmaster. If you want your directory somewhere else, put it here:
__________________________________________
If you prefer to submit your photo analysis pages right now, so we can build them into your app, you have two choices:
1) If your comments are text only, here's how to prepare your comments to send to us:
How to prepare text-only photo analysis pages.
Put the text for each photo in a separate text file. The file should have the extension ".txt" (lower case) and should be plain text (not Microsoft Word, for example).
Name the files exactly the same as the photos to which they are associated.
So, a photo named
BrownMaryFaceLift.jpg
will be associated with photo analysis file named
BrownMaryFaceLift.txt
If you are submitting separate before and after photos for our Photoshop people to join together, name your text file like the before photo.
When you zip up your photos and comments to send to us, place your .txt file in the same directory as its associated photo file.
2) If you want to create your own customized HTML for your photo analysis pages, here are the instructions:
Tech-y explanation of how to customize your own HTML for your photo analysis pages.
The "photo analysis" page is simply an .html file, a Web page. You can control background color, font style and font size, page layout, anything you normally control on a Web page. Submit the photo analysis .html files that you want in your app.
The pages you design should appear normal when displayed on a browser 320 pixels in width. They should contain no external links. Remember to keep a 5-10 pixel margin on left and right. The page can be as tall as you wish.
If you have images in your .html files, the images should be referenced in the same directory
as the .html file. Thus, an image would be referenced
like this:
<img src="MyPhoto.jpg">
and not like this:
<img src="media/MyPhoto.jpg">
Images can be .jpg, .png, or .gif. Extensions should be lowercase. The "html" in your html filenames should also be lowercase.
You may reference a stylesheet if you wish:
<link rel="stylesheet" type="text/css" href="Analysis.css">
You may name the stylesheet whatever you wish. As with the images,
the stylesheet should be referenced in the same directory as your .html
files.
One more point about the images. Because of the "retina" high-resolution display on the iPhone4, you can design the images on your photo analysis pages so they are ultra-sharp on the iPhone4. Here's how:
Lay out your page and size the image so it looks good on the page.
Your .html will now say something like this:
<img src="MyPhoto.jpg" width="200" height="150">
But the MyPhoto.jpg image that you send us should be twice as tall and twice as wide as the size that you coded into your image tag. So your image tag will still say 200wide x 150tall, but the image you submit should be 400 wide x 300 tall. That way, it will look normal on the iPad and the iPhone3, and it will look extra-sharp on the iPhone4.
Name your .html files exactly the same as the photos to which they are associated.
So, a photo named
BrownMaryFaceLift.jpg
will be associated with photo analysis file named
BrownMaryFaceLift.html
If you are submitting separate before and after photos for our Photoshop people to join together, name your text file like the before photo.
When you zip up your photos and comments to send to us, place your .html file and included images in the same directory as its associated photo file.
After your app is up in the App Store, we'll send you simple instructions for creating new photo analysis pages and uploading them to your server.
You can also override a photo analysis page that was built into your app: after your app launches, if you want to improve a particular analysis page, you just upload the new version of that page to your server, and that new version will replace the version that was built into your app.
17. Application and Support URLs
Your app's page in the App Store must have an "application URL", and a "support URL".
Trust us, you don't want to deal with this. We will gladly handle support for your app.
If, however, you are familiar with Application and Support URLs, and you want to host them, let us know.
18. Your questions
Any questions about how to prepare your app?
Email us.
Or call 1-402-933-9790.
Apple, the Apple logo, iPod, and iTunes are trademarks of Apple Inc., registered in the U.S. and other countries. iPhone is a trademark of Apple Inc.
© 2010 Steven M. Denenberg